18. Run live sessions with Events
Run live sessions with Events
Not all learning is self-paced. When you need people in the same room, or the same call, at the same time, you run an Event: a webinar, an in-person workshop, a live Q&A, an onboarding session. This article covers the whole lifecycle, from creating an event to marking who actually turned up. It comes in two short videos: Part 1 creates an event, Part 2 fills and runs it.
Before you start
- Decide the format. An event is either In-Person (it happens at a physical location) or Online (learners join virtually via Zoom, Google Meet or Microsoft Teams).
- For an Online event, connect a conferencing tool first. The first time you create one, 5Mins sends you to Choose your conferencing tool to connect Zoom, Google Meet or Microsoft Teams. Note the warning there: once selected, this becomes the default for you and cannot be reverted. Once connected, 5Mins generates the join link for you automatically, so there is no meeting link to paste.
- Open Events in the admin sidebar to see the list and the Create Event button.
Part 1 — Create an event
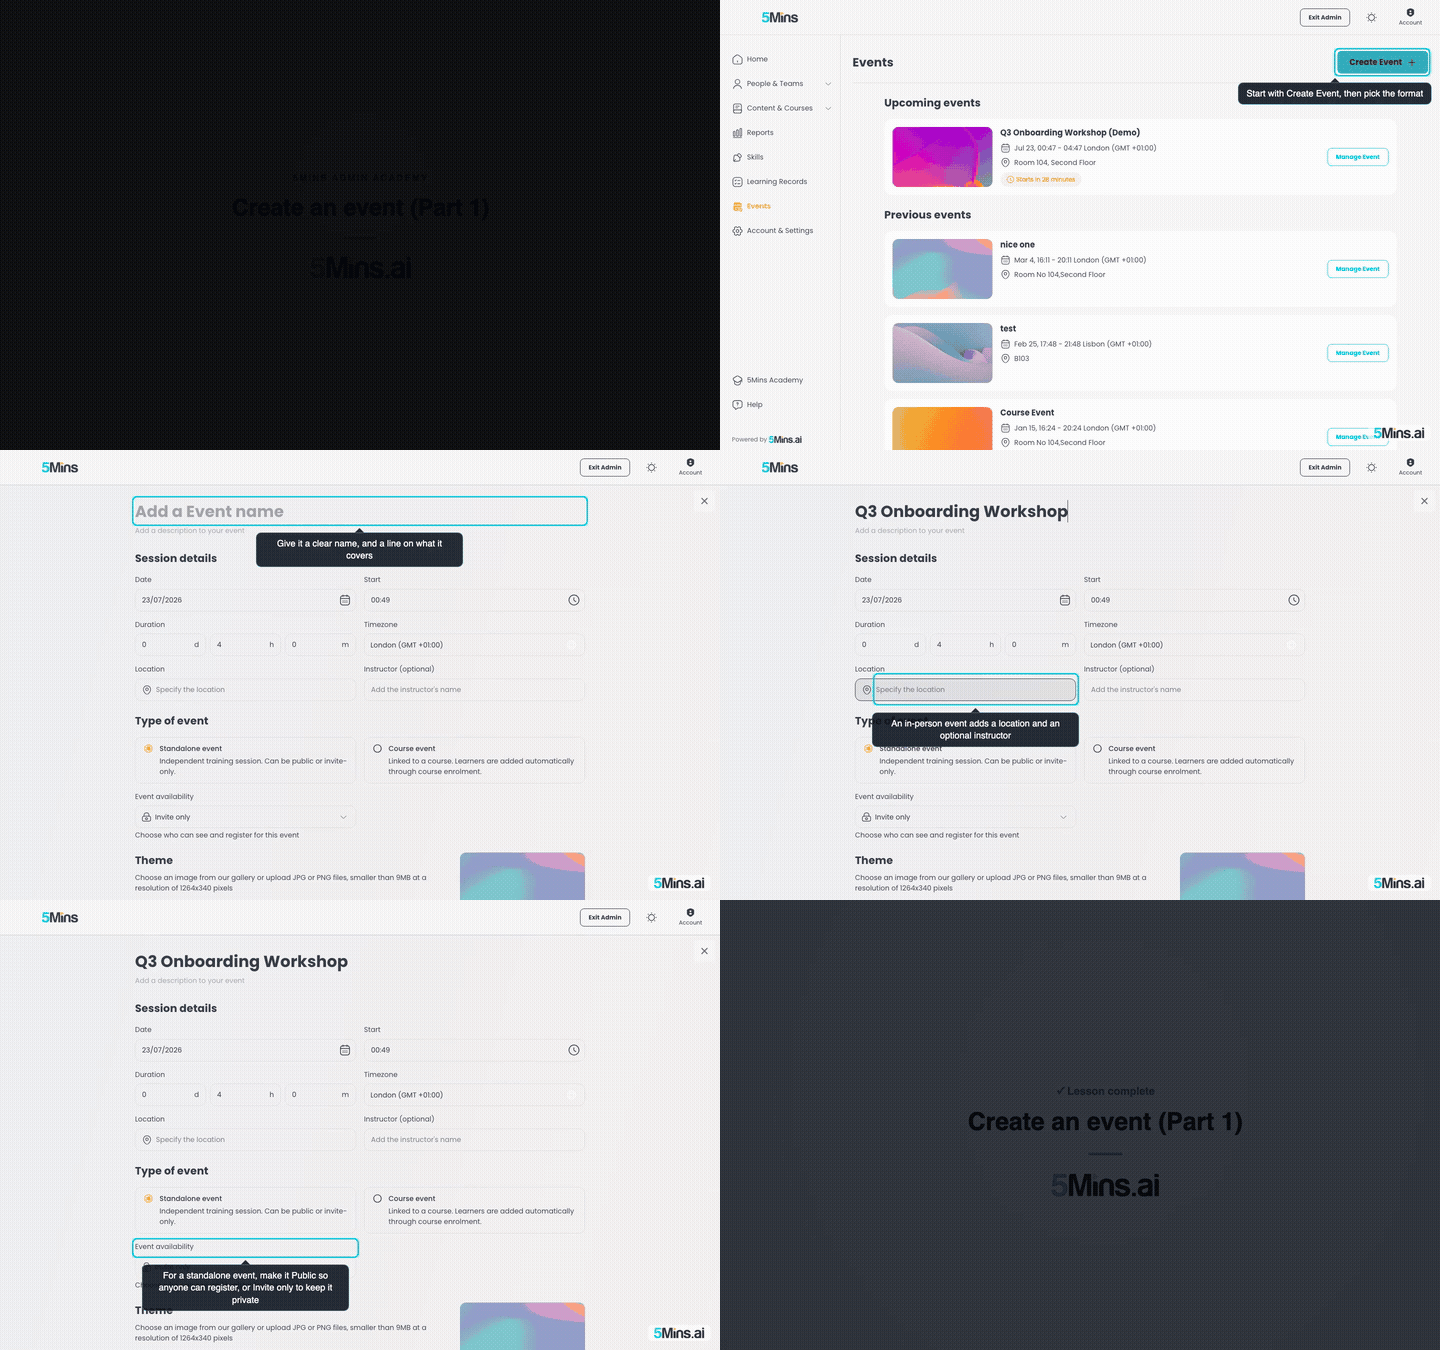
From Events, click Create Event and choose In-Person Event or Online Event. That opens the create form.
🎬 Watch this as a short narrated video
Steps shown in this video
- Events is where you run anything live - a webinar, an in-person workshop, a live Q and A
- Start with Create Event, then pick the format
- In-Person happens at a location. Choose Online instead and learners join over Zoom, Google Meet or Teams, with the join link generated for you
- Give it a clear name, and a line on what it covers
- Set the date, the start time, how long it runs, and the timezone
- An in-person event adds a location and an optional instructor
- Standalone stands on its own. A Course event links to a course, so everyone enrolled is added automatically
- For a standalone event, make it Public so anyone can register, or Invite only to keep it private
- Then Create Event - and it's live straight away, there's no separate publish step
- Event name and Description — give it a clear name and a line on what it covers.
- Session details. Set the Date, Start time, Duration (defaults to four hours, so trim it to fit), and Timezone (defaults to yours).
- In-Person events add a required Location and an optional Instructor name.
- Online events skip the location — the join link is generated for you. If you are on Zoom, you can add an optional Passcode so only people with it can join. (Zoom free accounts cap calls at forty minutes.)
- Type of event. Choose how the event relates to your content:
- Standalone event — an independent session. You then pick its availability: Public (anyone in your organisation can discover and register) or Invite only (only people you invite can see it).
- Course event — linked to a course. Learners are added automatically through course enrolment, so you do not invite them by hand.
- Theme. Pick a cover image (a default is already selected, so you can leave it).
- Click Create Event. There is no separate publish step — the event is live immediately and opens on its own page.
Part 2 — Fill it and run it
Creating the event is half the job. Now you invite people, and after the session you record who attended. Everything below lives on the event's own page, across its Sessions, Learners and Overview tabs.

🎬 Watch this as a short narrated video
Steps shown in this video
- Once an event exists, open it to run it - everything lives across Sessions, Learners and Overview
- The Learners tab is where you invite people and, later, track who came
- Invite Learners opens a two-step flow: pick people the same way you enrol them - teams, cohorts, filters - then review the email that goes out
- After the session, these tell you how many were invited and your attendance rate
- Mark Attendance, and set each person to Attended or Didn't Attend - in bulk for a single-session event
- Download Report gives you a clean CSV of who attended, for your records or a manager
- And the three-dot menu copies a shareable link, or cancels the event - which deletes it, so use that one deliberately
Invite learners
- On the Learners tab, click Invite Learners. This opens a two-step drawer.
- Step 1 — who. Pick people the same way you enrol them: All People, Team Managers, Teams, or a saved Cohort. Confirm with Select people.
- Step 2 — the email. Review the invitation message (it comes pre-written, and you can edit it), then send. Invitees get an email invitation, and you will see Invitation sent.
- For a Course event there is no invite button — learners flow in through course enrolment instead.
Mark attendance and export it
- The Learners tab shows two figures at a glance: how many Learners were invited, and your Attendance rate once the session has run.
- Click Mark Attendance and set each person to Attended or Didn't Attend. For a single-session event you can select people and mark them in bulk.
- Click Download Report for a CSV of names, emails, teams, session, and attendance — the record you keep for compliance or a manager.
Edit, cancel, and share
- Edit Details changes the event's name, description, passcode and cover. To change the date, time or location, edit the session instead (on the Sessions tab).
- In-Person events can hold multiple sessions — use Add Session on the Sessions tab to run the same event on several dates.
- The ⋯ menu offers Copy event link (to share directly) and Cancel Event. Note that cancelling deletes the event, so use it deliberately.
What your learners see
Invited or public learners find the event under Events in their workspace, split into Upcoming and Previous. They Register, optionally Add to Calendar (Google or Outlook), and when it is time they Join Event for online sessions. Afterwards they can Mark Attendance on their own card too, which feeds the same numbers you see.
Common questions
Can I cap the number of seats or run a waitlist?Not currently — there is no seat limit. Use Invite only availability if you want to control who can register.
How do I run a recurring event?There is no repeat rule. For In-Person events, add multiple Sessions to the same event to cover several dates.
Do people get a calendar invite automatically?No. Invitees get an email, and each learner can add the event to their own Google or Outlook calendar with Add to Calendar.
What's the difference between a Standalone and a Course event?A Standalone event stands on its own and you invite people to it. A Course event is attached to a course, so anyone enrolled in that course is added automatically.
Next up
You can now run live sessions alongside your self-paced courses, and prove who attended. Next: Go deeper on Learning Records, where event attendance sits alongside course completions in the record you export.